SchoolBooking SSO Integration Guide

Andy Larking
Last Update 4 years ago
Before you start
This guide has been written to help you configure SchoolBooking to operate with SSO (Single Sign on) Please treat this document as a reference guide, your individual network / servers may need to be configured in a different manner than described within this document. You will also notice we use examples referring to Microsoft IIS. If you use another Web service such as Apache you will find that some of the wording / functions are slightly different from the guide.
Do not make changes to your network or servers unless you fully understand what you are doing.
Please read this guide thoroughly before trying to configure SSO.
Introduction
SchoolBooking supports SSO and when setup basically means that when one of your users visits your portal / login page whilst within your network they will be automatically logged in to SchoolBooking using their Network / LDAP Credentials SSO will not work without LDAP setup, if you haven’t already got LDAP setup for your site please refer to the [LDAP & User Registration] module from Administration.
SSO is supported by Internet Explorer and Chrome, if you are using another browser please revert back to Internet Explorer / Chrome for testing.
There are many advantages of using SSO, mainly being your users will not need to remember any details whilst using the SchoolBooking service from within your network.
Prerequisites
LDAP must be configured and running before you start to setup SSO. (See related article for LDAP configuration)
You will need an IIS or compatible webserver server joined to the same domain as your users are working within.
Technical overview
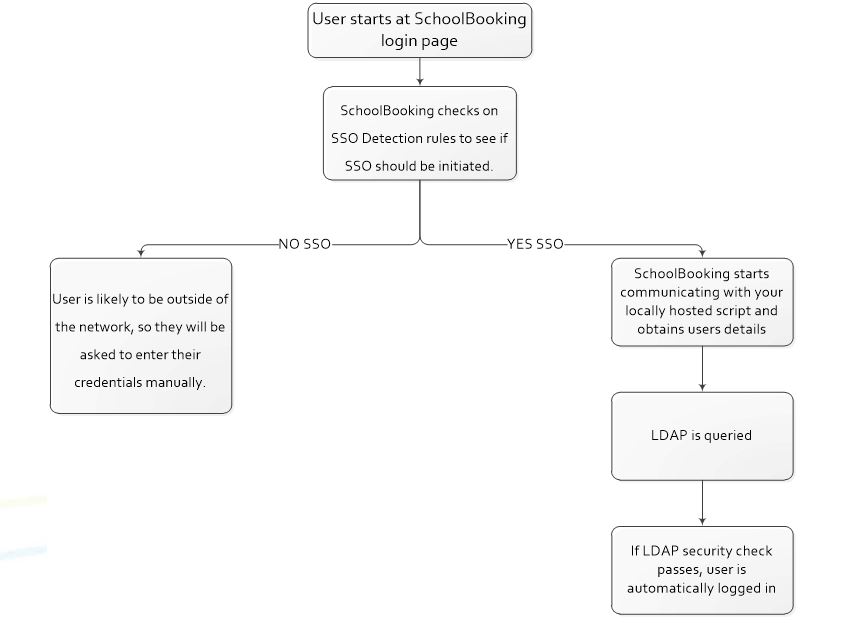
SSO is primarily designed to work on intranets and not on external websites. For us to work around this we ask you to host a small script on your locally hosted webserver which picks up the users credentials just like a local intranet would. We then forward these credentials securely via HTTPS to SchoolBooking and initiate a process which automatically logs the user on.
Restriction wise SSO will follow the filters you have put in place within LDAP. So if a user doesn’t fall within the specified LDAP filter they will not be logged in.
This flow diagram shows how SchoolBooking will work once you have configured all 5 SSO steps.
We have written this guide to take you through step by step each part of the Admin interface.
Please follow this guide as you run through the SSO Administration page online.
Step 1 – Passing Network Authentication Script
Please download the script and un-compress it from the zip file. You will need to create a separate folder within IIS for it to work.
An example would be c:\inetpub\mywebsite\schoolbooking\sb.php.
Once in place you need to let SchoolBooking know how it can access this script (you can rename it if you want). Please make sure you use an external address rather than internal to your webserver i.e. if you were at home what would you type into your browser to get to this file.
www.mywebsite.com/schoolbooking.com/sb.php
Step 2 – Script Setup
As step 2 is slightly more technical it has been broken down in to separate parts.
Custom settings
The script needs to know who you are as well as some security information. We have generated what you need to put into the script, so simply copy it from Step 2 and add it to the top of your newly hosted script.
Making SSO work on your network
There are two things you will need to do to make your network pass network details to the script.
1 – You will need to configure your IIS Server aware that is going to pick up user details.

Load IIS and select the folder which contains your script and click the Authentication Icon
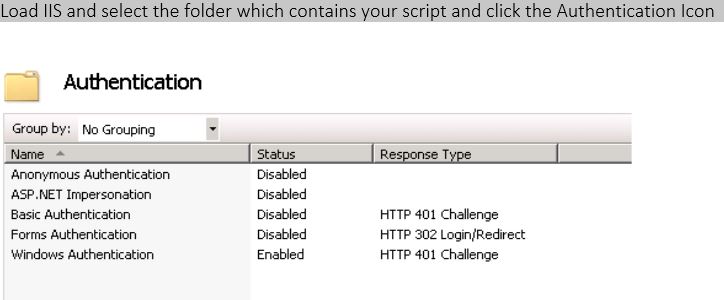
Switch on [Windows Authentication] and ensure that all other authentication methods are off.
2 – The web address you specified in the previous step must be listed as part of the Local Intranet within Internet Explorer on your client workstations.
For testing purposes you can manually add the address by loading Internet Explorer > Internet Options > Security > Local Intranet.
Tip: - We recommend you use Group Policy to roll this setting out across your whole network, to do this edit a policy and look under:
Under User Configuration, expand Polices > Windows settings >Internet Explorer Maintenance >Security
Double click Security Zones and Content Ratings, then chose Import the current security zones and privacy settings.
Click Continue, and then click Modify Settings.
In the Internet Properties windows chose Security tab, then click Local intranet, click Sites to add and type your script location (be sure to use the external address)
Testing the Script
You may have noticed whilst editing the now locally hosted SchoolBooking script there was a debug option. Go ahead and test the script by changing this “Yes” (and saving) and then load your Internet Explorer or Chrome and point your browser at your script i.e. http://www.mywebsite/schoolbooking.com/sb.php
A test will hopefully confirm all is working.
Once you are happy that everything has passed switch the Debug option to “No”.
Step 3 – LDAP Authentication
Unlike pure LDAP login, SchoolBooking is not sent the users full credentials i.e. username and password but instead a token. This means that unlike standard LDAP logins we have no username or password to be able to offer your servers to begin a query against your LDAP directory.
This means you will need to setup an account we can use to query your LDAP as users logon. This account does not need any high level permission, it can be quite restricted, but we suggest you test limiting this once all is working.
Step 4 – SSO Detection
Most of our sites allow their users to use SchoolBooking within the network but also at home. This could cause some problems as SchoolBooking won’t automatically know when to be looking for an SSO token or when to be asking for credentials manually.
We have two ways around this issue.
1 – SchoolBooking can detect the public facing IP address is of anyone browsing the internet from your organisation. If this address is added into SchoolBooking we will then initiate SSO upon seeing this IP Address and if we don’t see it, we will revert back to asking for the user to type their credentials in manually.
We allow you to enter a range when specifying your Public IP as you may have more than one externally facing IP address (ask your broadband provider for more details)
If you want to force SSO continuously no matter what address the user is coming from Type ALL in both the From and To boxes. SchoolBooking will then initiate the SSO on every visit no matter where the client is. The problem of this is when a user is outside of your domain and accesses SchoolBooking the script specified in Step 1 will be requested, and as your webserver doesn’t know who the user is it will display a very standard Windows Login prompt without much detail, this may confuse the user.
Another way of initiating SSO from within your network is to leave the address range blank and simply roll out a SSO shortcut (shown at the bottom of Step 4). This Shortcut should again only be used within your network so when users are at home they use a regular SchoolBooking website / shortcut otherwise they will again be faced with a windows logon dialogue box.
Step 5 – Enable / Disable
All should now be in place for you to enable SSO for your site. We recommend you make a copy of the web address at the bottom of step 5, this is a manual way of avoiding SSO and will be needed if you want to log back into SchoolBooking with a local SchoolBooking account such as Admin rather than your SSO account.