Letting Plans - date allocations

Andy Larking
Last Update 4 years ago
Introduction
This page determines on which dates the selected Facility is available for Letting, and which Daily Plan
applies on those dates.
For the purposes of this guide, two Daily Plans named ‘Weekdays’ and ‘Weekends’ have been created. Your version may have anywhere between 1 and 9 different Plans listed.
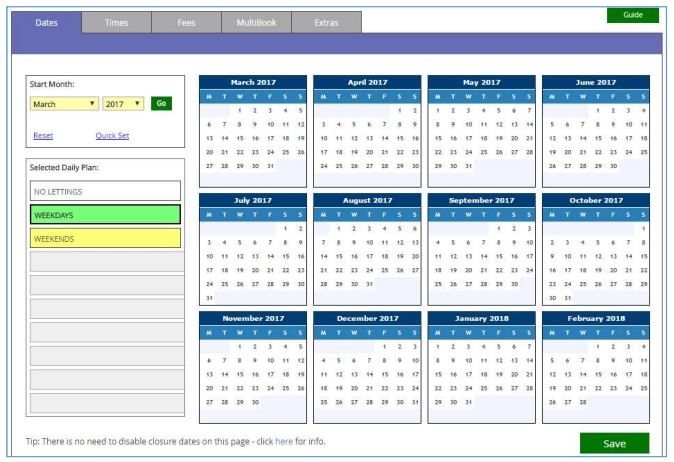
The main display is split into three areas...
In the top-left corner is the Start Month selector...
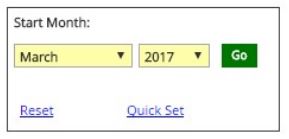
Because of the large amount of data involved, only a twelve month period can be updated here at any one time. By default, it will begin with the current month but, if required, you can select a different starting point via the drop-down menu.
Clicking on ‘Reset’ will refresh the page, cancelling any changes you have made since the last Save.
The ‘Quick Set’ option will be useful if there is a regular pattern to the Plan allocations (e.g. the Plan named Weekends applies every Saturday). This option is covered in further detail on page 3 of this guide.
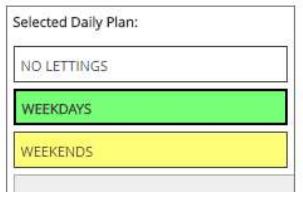
In the lower-left area is a table listing all Daily Plans for this Facility, as well as a separate entry named ‘No Lettings’.
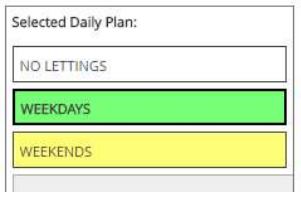
When setting the allocation to individual dates, it is the entry highlighted here (with a thicker border) that signifies which Plan will be assigned. This is covered in further detail on page 4 of this guide.
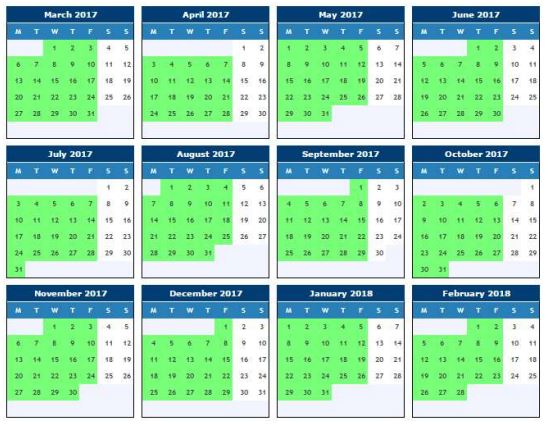
The larger area consists of twelve monthly calendars and is where the Plan allocation for each date can be viewed/updated.

Each date is colour-coordinated (with the Daily Plans list) to signify its allocation.
Using the example above...
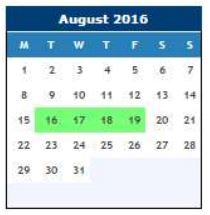
i) all dates in August have a white background (NO LETTINGS).
ii) in September, all weekdays – with one exception - have a green background (WEEKDAYS). This means that during the ‘Make a reservation’ process, those dates will make use of the slots, fees etc recorded for that Plan.
iii) all Saturdays and Sundays during September have a yellow background (WEEKENDS).
iv) September 14th has a white background (NO LETTINGS).
There are two methods to update the date allocations...
Quick Set
Often, there will be a pattern to the required allocations (e.g. all Wednesday’s require the Weekday Plan). If that is the case for you, start with the Quick Set option.
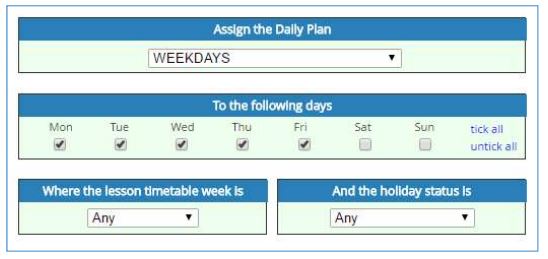
This involves selecting...
i) the Plan that is to be assigned.
2) which days of the week should be assigned that Plan.
3) whether to only update those days if a specific timetable week applies.
4) whether to skip (or only include) dates that are logged as a holiday/closure.
Note: the final two options are determined by settings recorded in the Administration/Academic area of the system. After confirming your selections, the calendars will update accordingly.
After confirming your selections, the calendars will update accordingly.
If required, you can now repeat this for any other Plans.
Individual Date Allocation
This can be used if...
● After the Quick Set method has been used, there are a few stray dates that need adjusting (for example: that 14th September date mentioned on page 2 will now need clearing)
Or
● There is a plan that has no regular pattern.
This method involves...
Selecting the Plan that you want to apply.
Clicking directly onto the dates that will be making use of this plan.
Final Actions
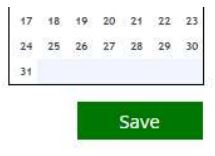
Once you have completed the applicable allocations, click on Save in the bottom-right corner of the display.
If you will be allowing lettings far into the future, you can now set a new Starting Date to allocate Plans to a new batch of dates.