Payments & Invoicing

Andy Larking
Last Update 4 years ago
Introduction
1 – Site overview
2 – Hirer overview
3 – Invoicing a letting
4 – Viewing existing invoices
5 – Recording receipts
6 – Allocating receipts to an invoice
7 – Account Statement
Introduction
The Payments & Invoicing area of SchoolBooking is for managing the charges and receipts relating to your letting reservations.
The following pages cover each of the key functions in detail.
1 - Site Overview
The initial Payments & Invoicing page lists all hirer accounts along with figures for their Total Charges, Total Receipts, and Overall Balance.
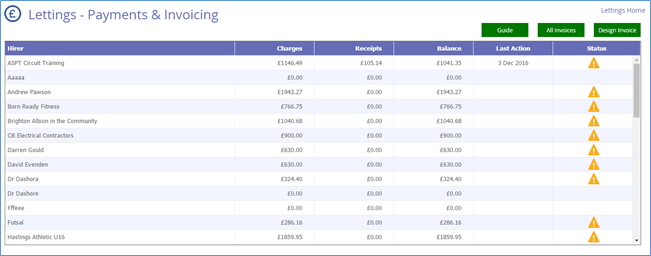
To enable a lettings manager to quickly spot which accounts require further action, the final column will include a warning triangle should any of the following apply...
● There is a late payment that needs investigating.
● There are lettings that require an invoice to be issued.
● A payment has been received that has not been fully allocated to an invoice.
Clicking on the applicable row will take you to the pages specific to that single hirer.
---
Tip: In the top-right corner of the page is a ‘Design Invoice’ button. Before you start issuing ‘real’ invoices, you may wish to return here to customise the look of your own form.
2 - Hirer Overview
After selecting an account on the Index page, you are taken to the overview page dedicated to that single hirer.
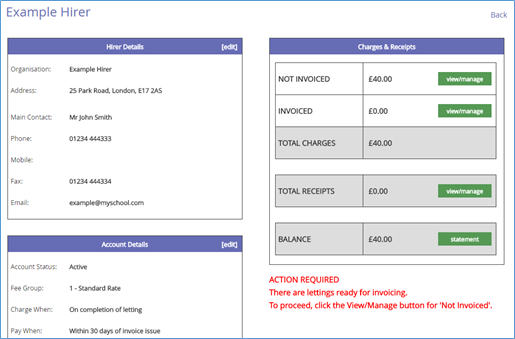
To the left of the page are the hirer’s details and settings. These may already have been completed during the initial setup of the account. If not, click Edit in the purple header to update these details.
Note: Clicking on Edit will take you away from the Payments & Invoicing area of the system and over to the Hirer’s module. To return here, use the ‘Back’ link in the top-right corner of the page.
There are two key settings under Account Details that affect the behaviour of this Payments & Invoicing area. They are ‘Charge When’ and ‘Pay When’.
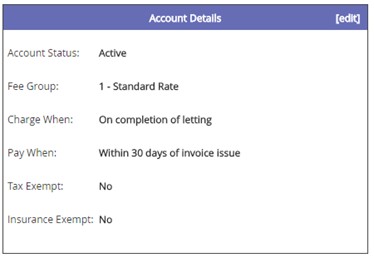
Charge When
This setting determines at what stage a letting reservation is ready for invoicing. The options are...
IMPORTANT
Once a letting has been invoiced, it becomes ‘locked’ meaning that it can no longer be amended or cancelled (without first cancelling the invoice).
Therefore, ideally, a letting should only be invoiced once you are confident that...
i) it will definitely go ahead, ii) the applicable fees are correct and will not be disputed.
If you are able to wait until the letting has already taken place before raising the invoice, this will significantly reduce the risk of this ever being an issue, however, if that is not an option for you, please be aware that additional steps will be required should you need to adjust/cancel that letting later (see page 6 of this guide).
● Once the letting has completed.
● As soon as the letting is logged in the system.
● One month prior to the reservation date.
● Two months prior to the reservation date.
● Three months prior to the reservation date.
Payment Due
This option determines how soon after an invoice has been issued should the system flag a late payment (if the applicable payment has not been received).
This setting will not affect any of the figures displayed, however, it will determine which alerts appear on this and the previous page.
---
The area to the right of the display shows the hirer’s total Charges, Receipts, and overall Balance. It is from here (via the green buttons) that you can create new invoices, log new receipts etc.
Each of these actions is covered in the next few pages.
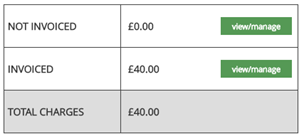
Note that the charges figures are split into two.... one covering lettings that have already been invoiced and another for those lettings still awaiting their invoice.
3 – Invoicing a Letting
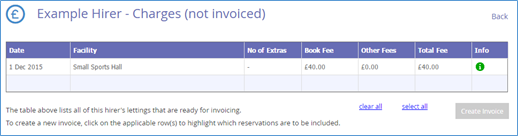
As soon as a letting becomes chargeable, it will appear within the Not Invoiced area.
The main display lists all of the hirer’s individual lettings that have yet to be invoiced along with their core information. The final column includes an info icon which, if clicked, will produce a pop-up box showing further details about the reservation.
To select which lettings should appear in the next invoice, click on the relevant row(s) so that they highlight in green (click again to deselect a row).
When ready, click the Invoice button just below the main table. This pop-up will appear....
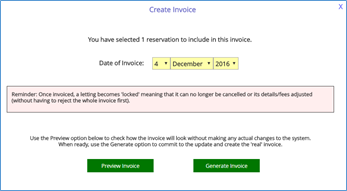
i) In most cases is recommended that the invoice is Previewed first. This will enable you to check exactly how the document will look and also what is included without committing to any system updates. From there you can then decide whether to proceed with the invoice or not.
ii) Alternatively, you can commit to the update without previewing. This option is only recommended if you fully familiar with the system and know that a preview is unnecessary on this occasion.
Once confirmed, the page will refresh leaving just those lettings (if any) that were not previously selected.
On returning to the Hirer Overview page, note that the figures for Invoiced and Not Invoiced have been updated.
4 – Viewing Existing Invoices
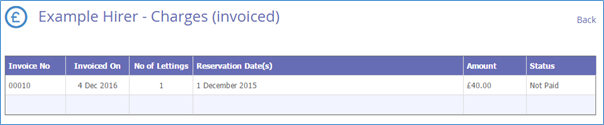
This page lists all invoices previously generated for this hirer. Normally you would only need to come here if a payment is flagged as late, or there is a query/dispute with what has been included and you need to see a copy for yourself.
Note the Status column in the final column. This shows whether the invoice has been paid or is still awaiting payment. Should a Not Paid entry appear in red text, this is to signify that (based on the hirer’s ‘payment due in X days’ setting) the payment should have by arrived by now.
Tip: This does not necessarily mean that the payment hasn’t been received - it may just need allocating (see next section – Receipts).
---
To view further details about an invoice - including the option to reprint it - click on the applicable row.
Cancelling an Invoice
Should you later discover an error in an invoice (e.g. the fees are incorrect or a letting included in it was changed), the invoice can be cancelled. This will...
● Set all individual lettings included back to a status of ‘Not Invoiced’.
● Set any receipts that have already been allocated to it back to a status of ‘Not Allocated’.
● Unlock those lettings so that they can once again be amended in the Manage area of the system.
After making the required changes to the applicable lettings, you can then return here and include them in a new invoice.
Note: Cancelled invoices will still stay on record, however, their original charges are ignored in all balance calculations.
Addition: In certain scenarios, there is an alternative to cancelling the invoice that involves logging a Credit Receipt to make up for any overcharges. See page 8 of this guide for further details.
5 – Recording Receipts
When a new payment arrives, it should be logged in this area.
The main display will list all payments (and credits) previously recorded for this hirer account.
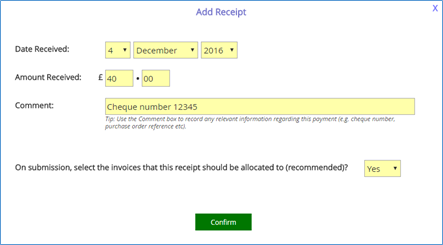
Firstly, make sure that the payment hasn’t already been added to the system by another lettings manager and then click on the Add Receipt button in the top-right corner of the display.

A pop-up box will appear asking for the date that the payment was received along with the applicable amount. The Comment field can be used to record any other relevant information (cheque number, purchase order reference etc).
Tip: Be particularly careful when entering the Amount Received. Although the date received and comment can be amended later if required, the amount can only be changed by cancelling the receipt and logging it again.
Note the final entry referring to Allocations. In most cases, this should be left as Yes as, once logged, the payment will need be assigned to the applicable invoices.
Credits
In most cases it is recommended that an incorrect invoice be cancelled and then reissued again with the correct details. However, there are certain scenarios where you can leave the invoice as it is and instead use Credits to balance the hirer’s account.
Example 1
The hirer has been invoiced for ten individual lettings (total £500), one of which didn’t take place (£50).
If... The affective slots on the letting grid do not need to be freed up to allow another reservation to be logged.
And... It is not going to cause an issue that the letting records show that the reservation completed as normal.
Then... You can add a credit of £50 and allocate it to the applicable invoice. This will leave an outstanding balance of £450.
Example 2
The hirer has been invoiced for £500 (10 individual lettings of £50 each), however, one of those reservations should have been for a reduced rate of £40. Therefore, the hirer has been overcharged by £10.
If... You are not concerned that the affected reservation continues to show a charge of £50 within the letting records area.
And... You are not relying on SchoolBooking reports to show how much income a facility is generating for you.
Then... You can add a credit of £10 and allocate it to the applicable invoice. This will leave an outstanding balance of £490.
Important: Although this method may seem quicker/easier than cancelling the invoice and starting again, it does have its own drawbacks that, in the longer term, may prove to be an issue. In particular...
- If a letting didn’t take place but isn’t cancelled in the system, this will make a facility appear more popular than it actually is.
- If a letting includes a fee that didn’t really apply, the applicable facility will show that it is generating more income for you than it is in reality.
Therefore, if you are reliant on SchoolBooking in determining how successful and profitable a facility is proving to be for letting purposes, the Credit method should be used very sparingly.
6 – Allocating receipts to an invoice
On submission of a new payment/credit you will be taken to a new page.
The top area of the display is a confirmation of the receipt details you have just entered.
To the right it will show an Allocated figure of £0.00 and a Not Allocated figure matching the receipt amount.
Below this is a table listing all invoices that still have a payable amount outstanding.
Example 1 - Receipt for a single invoice
If the receipt covered just the one invoice, this is a simple process of just clicking on the applicable row in the list of open invoices. The page will then auto-refresh.
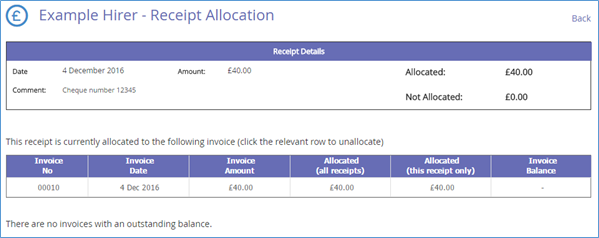
Note that the Allocated and Not Allocated figures in the top table have switched. The £0.00 figure for Not Allocated means that this receipt has now been fully assigned.
Additionally, the Invoice Balance in the lower table is now blank. This shows that the invoice has now been paid in full.
Tip: If you realise later that the receipt has been allocated to the wrong invoice, just return here and click on the invoice’s row again to unallocated it.
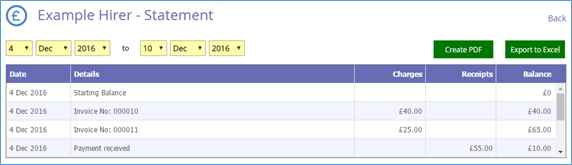
Example 2 – Single receipt for two or more invoices
If the receipt covers more than one invoice, things become slightly more complicated, but the same principle applies.
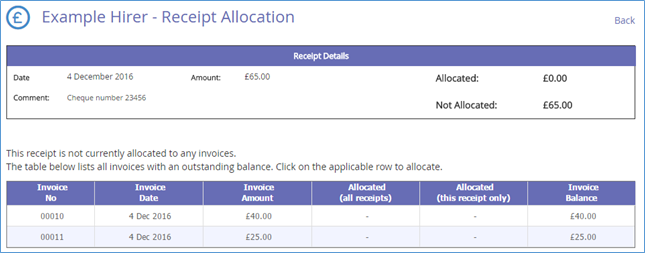
In this example, a payment of £65 has been received.
This covers two outstanding invoices of £40 and £25.
Click on the first invoice’s row and the page will update.
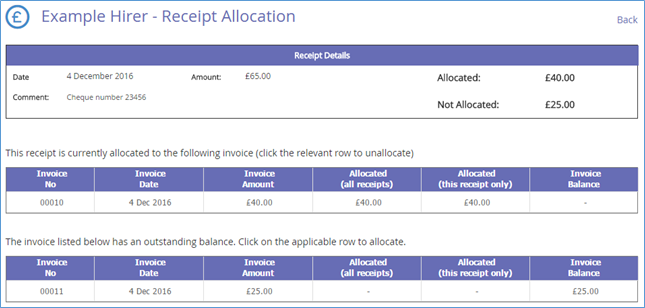
Note the Allocated/Not Allocated figures in the top table.
Because £25 of the original £65 is still unallocated, the table listing the unpaid invoice remains on display. Click on the applicable row in the lower table to assign the £25.
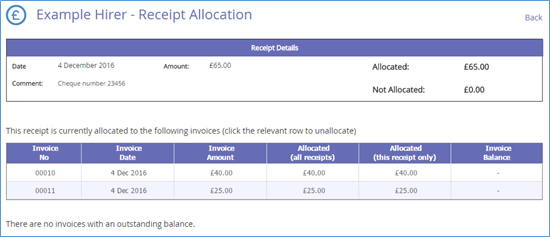
As in Example 1, the receipt has now been fully allocated and both of the invoices have a zero outstanding balance.
Example 3 – Receipt logged does not match invoice totals.
In this example a payment of £55 has been received.
However, the combined total of the outstanding invoices are £65 - one for £40, another for £25.
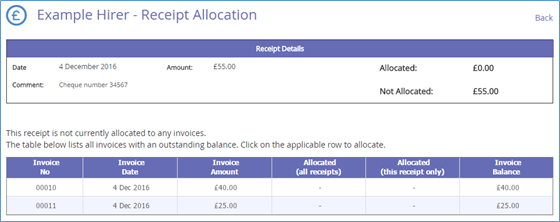
For this scenario, you would still allocate this payment to both invoices as in Example 2, however…
When allocating to the second invoice you will receive a warning message that there are not enough unallocated funds remaining to cover the invoice in full.
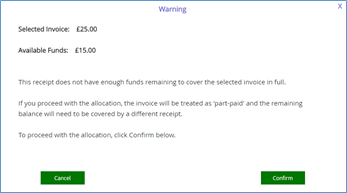
If you are sure that the payment is intended for this invoice, you can safely proceed.
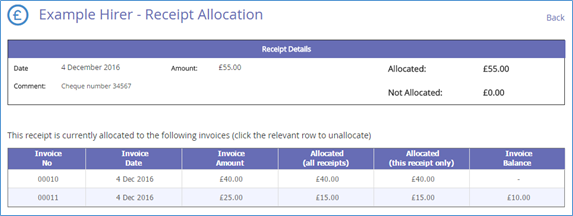
Note the Balance entry on the second invoice. This invoice has a total charge of £25 but only £15 was available to cover it. The remaining £10 is still unpaid and this amount will appear in the list of outstanding invoices when you next allocate a new receipt.
In the meantime, the invoice’s status will report as ‘Part-Paid’ and will still highlight as a late payment should the remaining amount not be received within the ‘pay within X days’ setting.
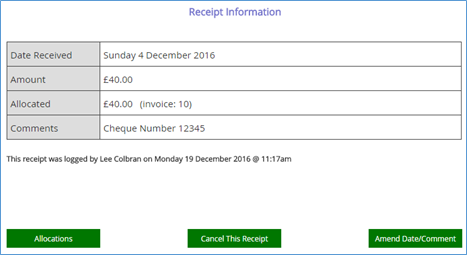
Receipt Allocations (revisit)
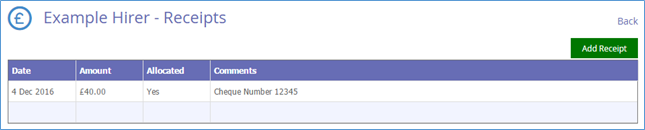
After logging a receipt and allocating it to the applicable invoice(s), the main Receipts page will update accordingly.
As with the other tabled pages in this module, clicking on a single row will show more details about a specific receipt.
7 - Account Statement
The Account Statement is a report that lists all of this hirer’s invoices and receipts in date order to show their running balance over time.
To the right are two exporting options….
This will create a printable pdf report showing the same details/layout as currently onscreen.
Excel
This will transfer over the onscreen details to a spreadsheet file where you can use the data to create your own customised reports.
By default, the page will display all Charges, Payments, and Credits. Should you require a statement covering just a specific period of time (e.g. a single year or month), use the date filters above the main table.